Recipe - Stripe webhook integration
These recipes cover Stripe webhooks and Stripe checkout sessions for payment integration.
How to create Checkout Sessions
| How to create Checkout Sessions |
|---|
| Step 1 - In Stripe, obtain your API keys in Test Mode Step 2 - In Salesforce, create a Named Credential Step 3 - Build the Screen Flow |
Checkout Sessions are special links that redirect the user to Stripe. The link includes their shopping cart contents. Stripe collects payment, then redirects the user back to Salesforce.
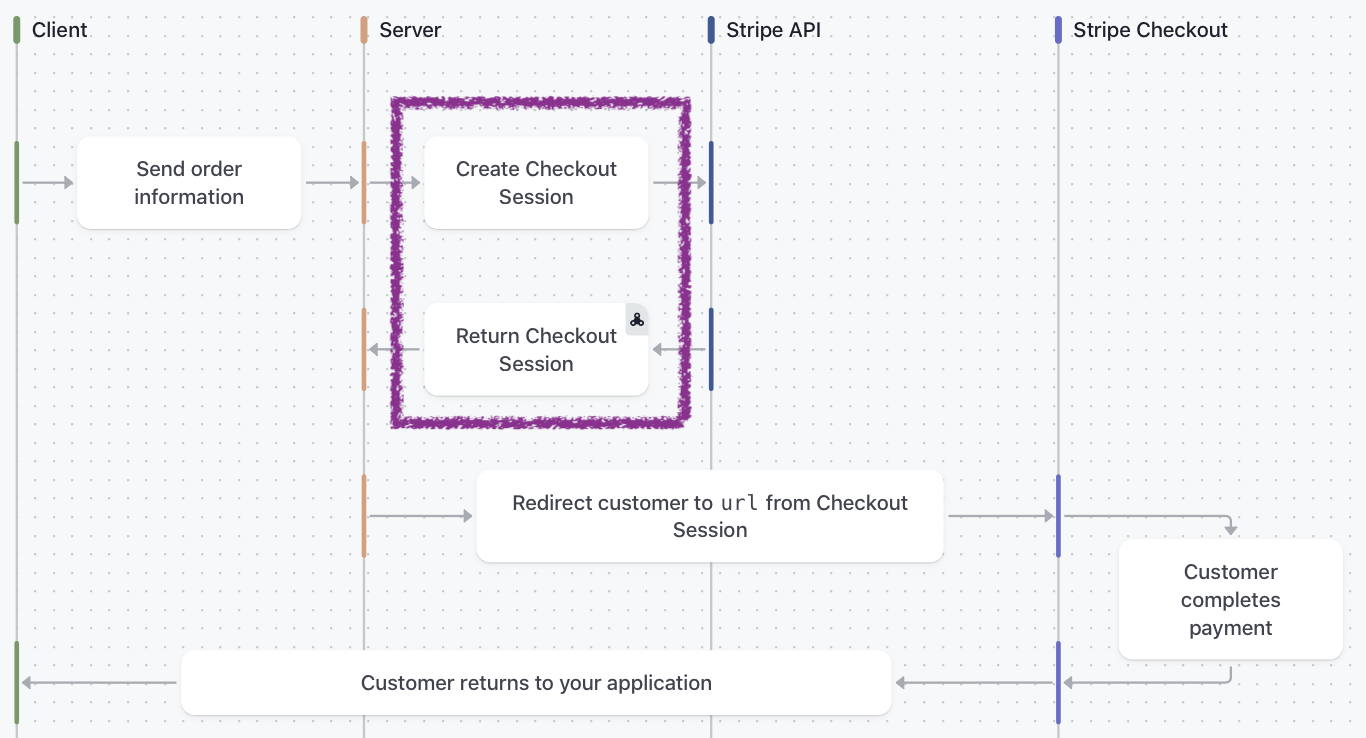
In this example we will create the checkout session (highlighted above) using a script. The checkout session collects payment when the user finishes a screen flow.
Step 1 - In Stripe, obtain your API keys in Test Mode
January 2025 update: click the gearwheel in Stripe to get to settings. The first time you visit the Developer settings, click Enable Workbench then click Start Using Workbench. This reveals the hidden Webhooks tab used in this recipe.
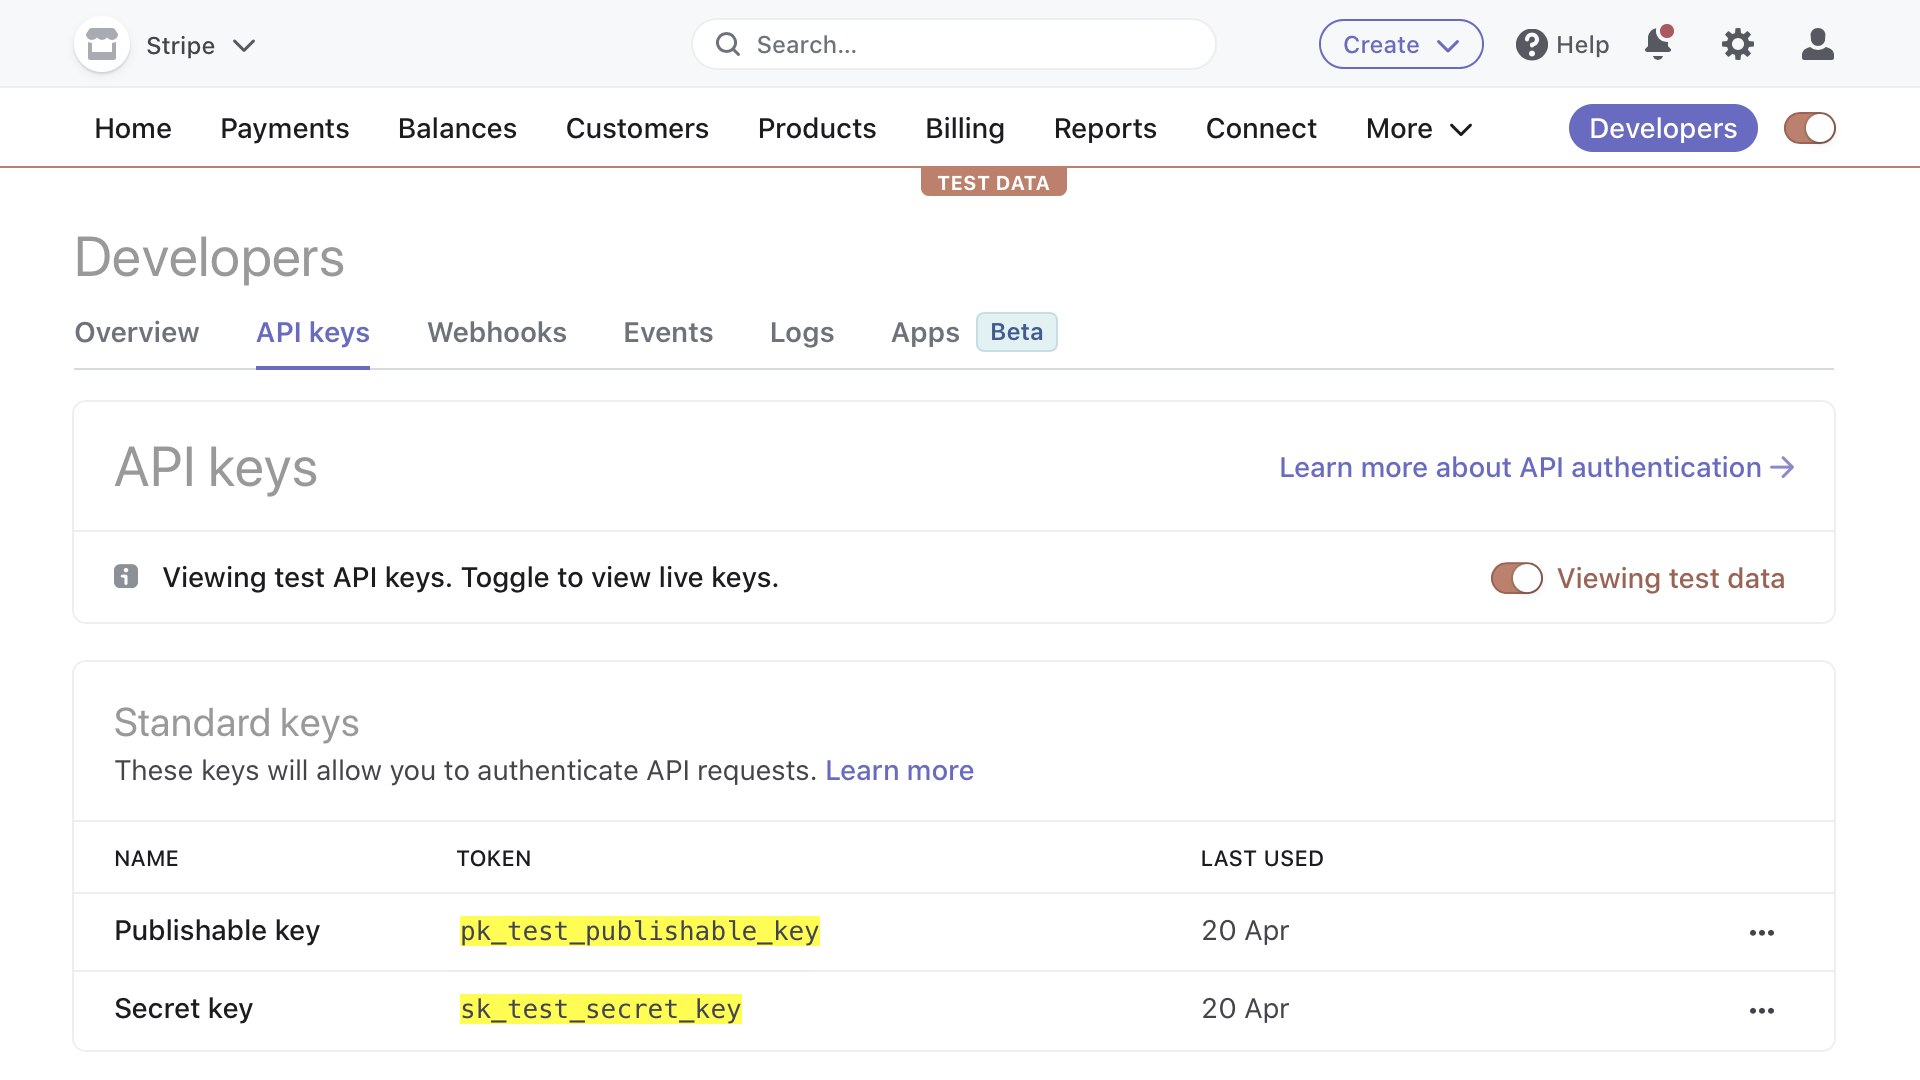
- Go to Stripe: Developers > API keys
- Copy your Publishable Key
- Also copy your Secret Key
Step 2 - In Salesforce, create a Named Credential to hold your API keys
- Navigate to Named Credentials > New [Click the ▽ arrow icon] > New
- Label: https_api_stripe_com
- Name: https_api_stripe_com
- URL: https://api.stripe.com
- Identity Type: Named Principal
- Auth Protocol: Password Auth
- Username:
pk_test_publishable_key(paste your Publishable key from Stripe) - Password:
sk_test_secret_key(also paste your Secret key from Stripe above) - Generate Authorization Header: [_] Uncheck
- Allow Merge Fields in HTTP Header: [X] Check
- Allow Merge Fields in HTTP Body: [X] Check
- If you use External Credentials, set the Managed Package Access: Streams
Step 3 - Build the Screen Flow
- Navigate to Setup > Flows > Create a new Screen Flow
- Add a new step, name it Streamscript
- Copy and paste the script below
- Click Done
# Streamscript to create a Stripe Checkout Session
$url = 'callout:https_api_stripe_com/v1/checkout/sessions'
$headers = {}
$headers.Content-Type = 'application/x-www-form-urlencoded'
$headers.Authorization = 'Bearer {!$Credential.Password}'

# Shopping cart
$params = {}
$params.mode = 'payment'
$params.cancel_url = 'https://www.example.com/cancel'
$params.success_url = 'https://www.example.com/success'
$params.put('line_items[0][quantity]', 2)
$params.put('line_items[0][price_data][product_data][name]', 'GenWatt')
$params.put('line_items[0][price_data][unit_amount]', 99900)
$params.put('line_items[0][price_data][currency]', 'USD')
$params.put('metadata[sf-order-id]', 'my_id_123')

# Form-encoded POST
$payload = $params.toUrl();
$response = Http-Post $url $headers $payload
$result = Json-Decode $response.body
Log $result; return $result.url
Comments: This script uses the protected fields of a Named Credential as a best practice. Refer to the Salesforce docs for an explanation on how the callout and $Credential merge fields work. Starting in 2024, Stripe has new API params for checkout: https://stripe.com/docs/payments/checkout/migrating-prices
- Next, add a Screen element
- Drag in a Display Text component
- In the rich text editor, click the Link button
- Enter the Link Title: Click here to check out »
- Then enter the Link URL: {!Streamscript.text}
- Click Done
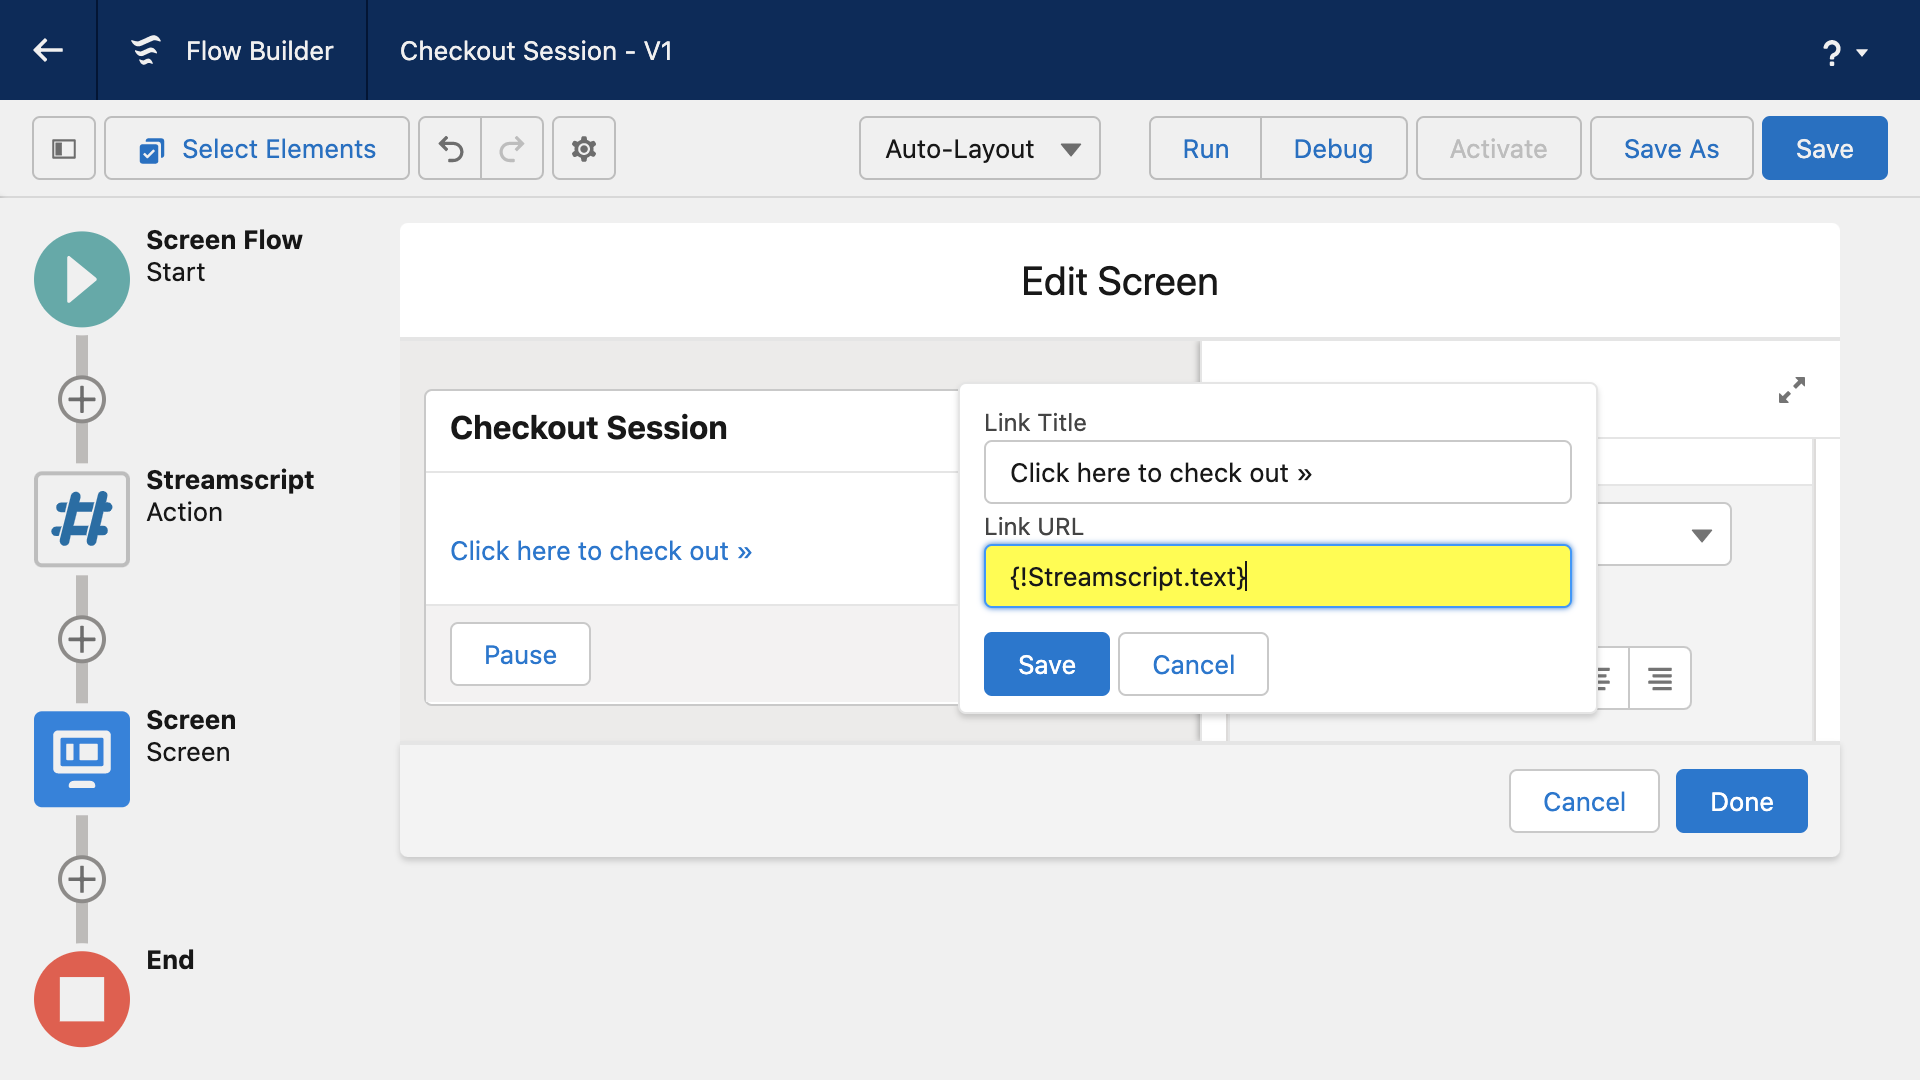
Comments: By using rich text you can display a clickable hyperlink to the user. It is a good place to set expectations about opening a new window and having the card ready. This pattern may also be used with flows in sites/communities.
The checkout flow is ready!
- Save the flow
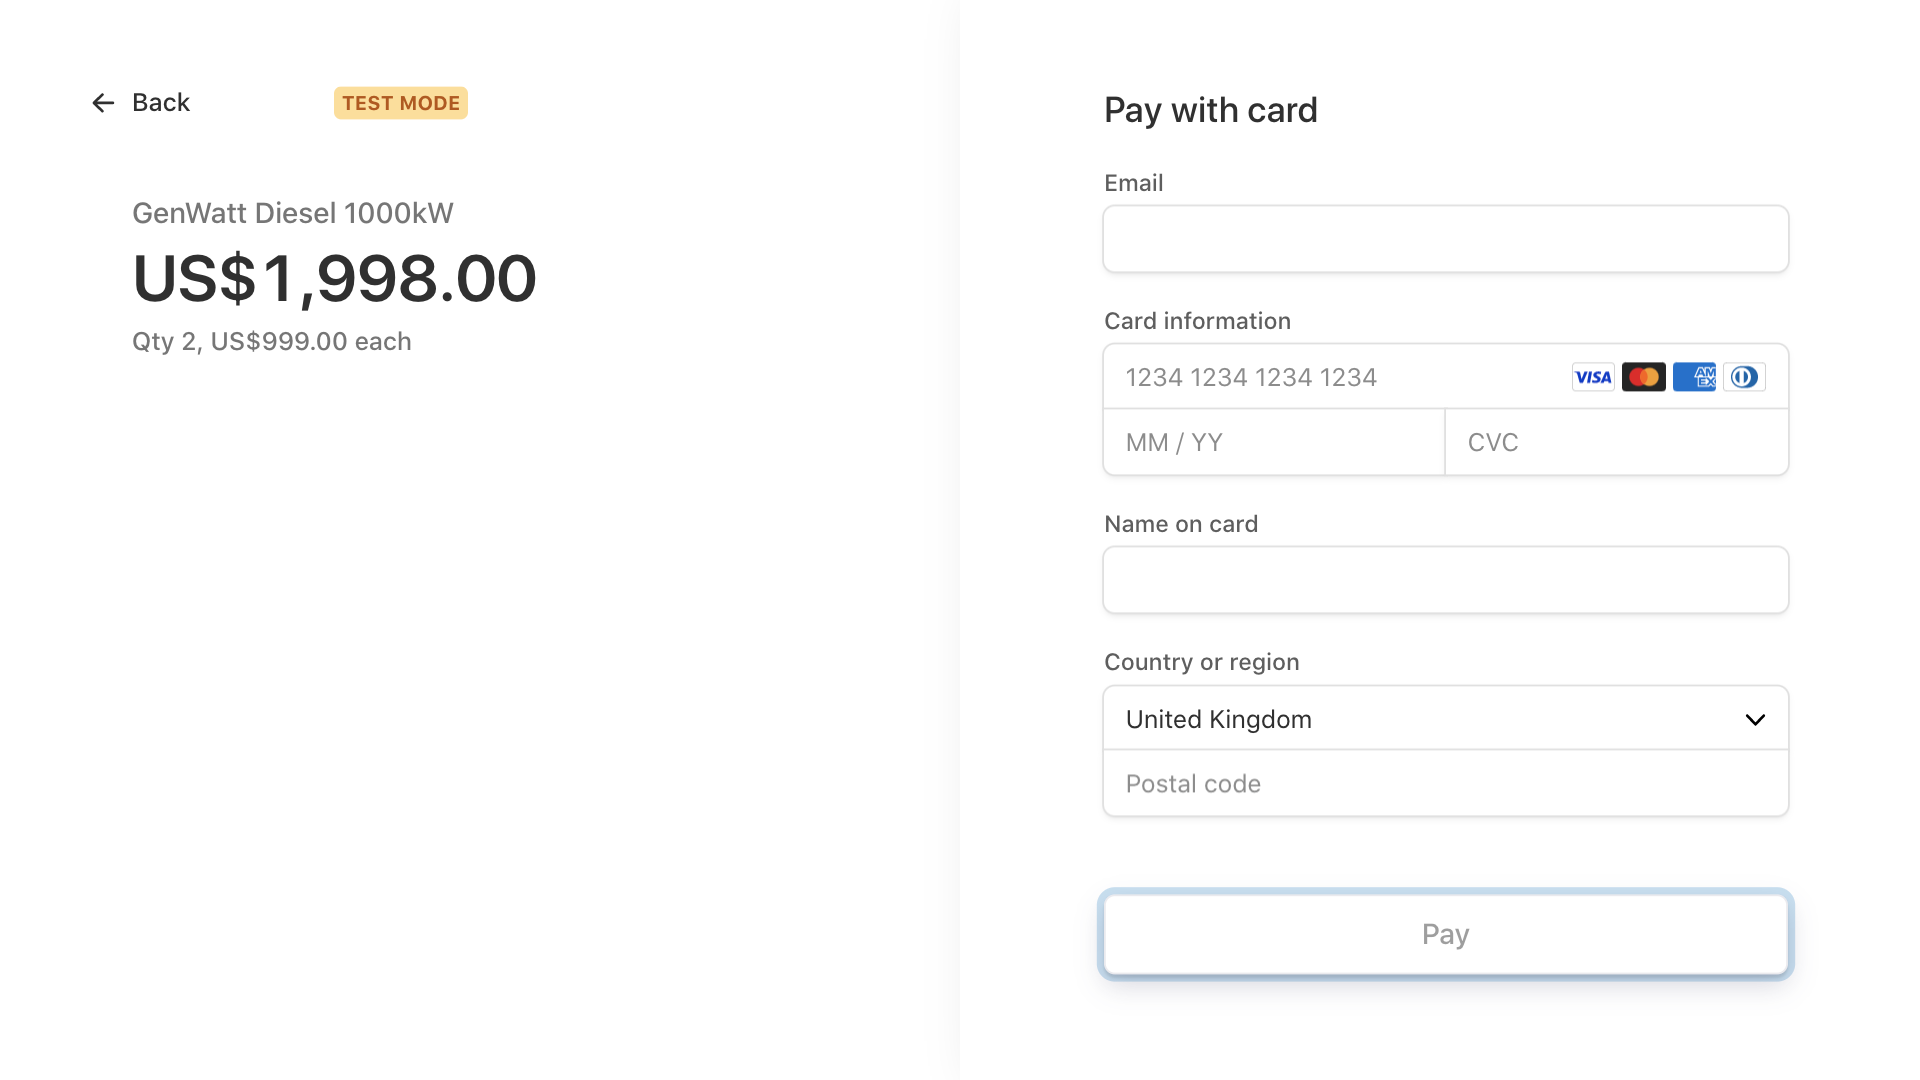
- Click the Debug button to iterate and test.
How to receive Stripe webhooks
| How to receive Stripe webhooks |
|---|
| Step 1 - In Salesforce, prepare the webhook flow Step 2 - In Stripe, add the webhook endpoint Step 3 - In Salesforce, verify the webhook |
Webhooks listen for Stripe activities like subscription payments sent to Salesforce. You collect the events using Streamscript and execute flows to handle them. Here's how:
Step 1 - In Salesforce, prepare the webhook flow
- Set up a Demo site by navigating to Setup > Sites > New Site
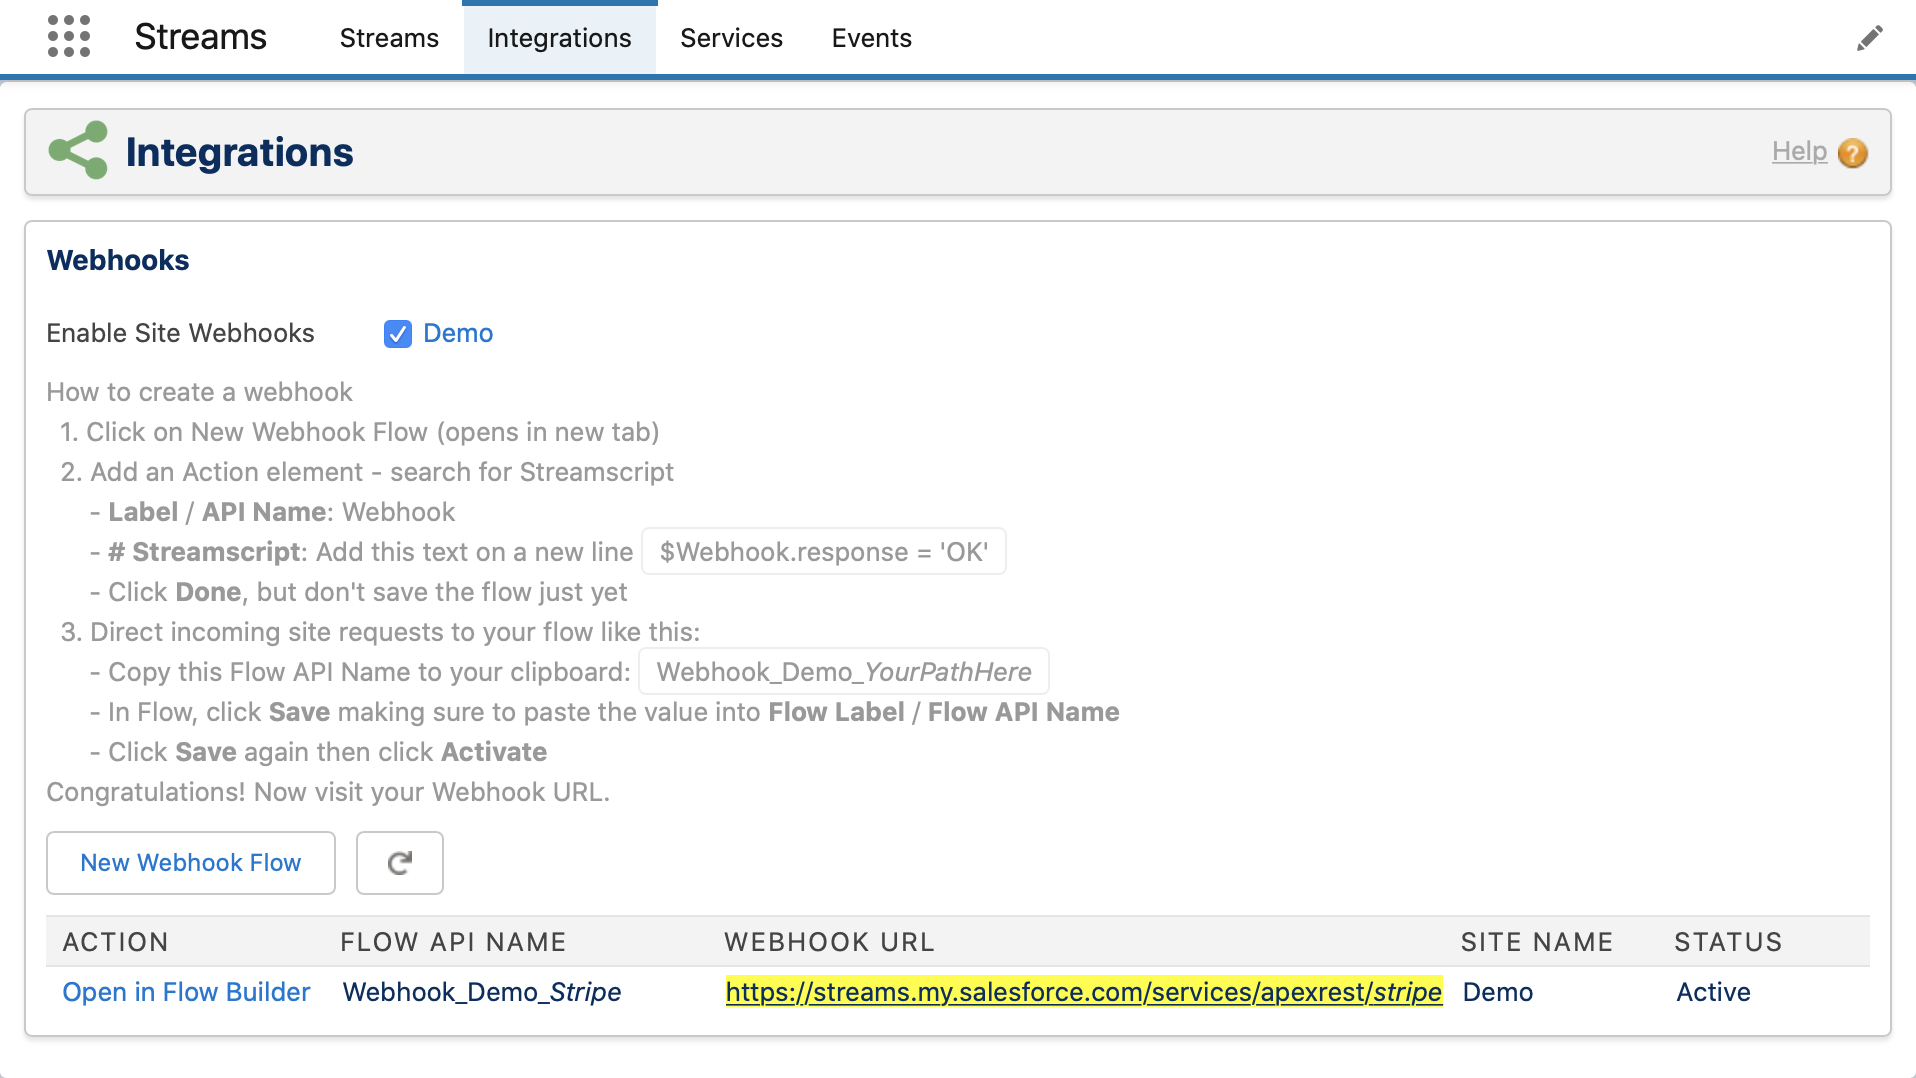
- Then, in the Streamscript app Integrations tab, click New Webhook Flow
- Save the flow with this API Name: Webhook_Demo_Stripe
- Return to the Integrations tab to see the webhook
- Copy the Webhook URL to your clipboard:
Step 2 - In Stripe, add the webhook endpoint in Test Mode
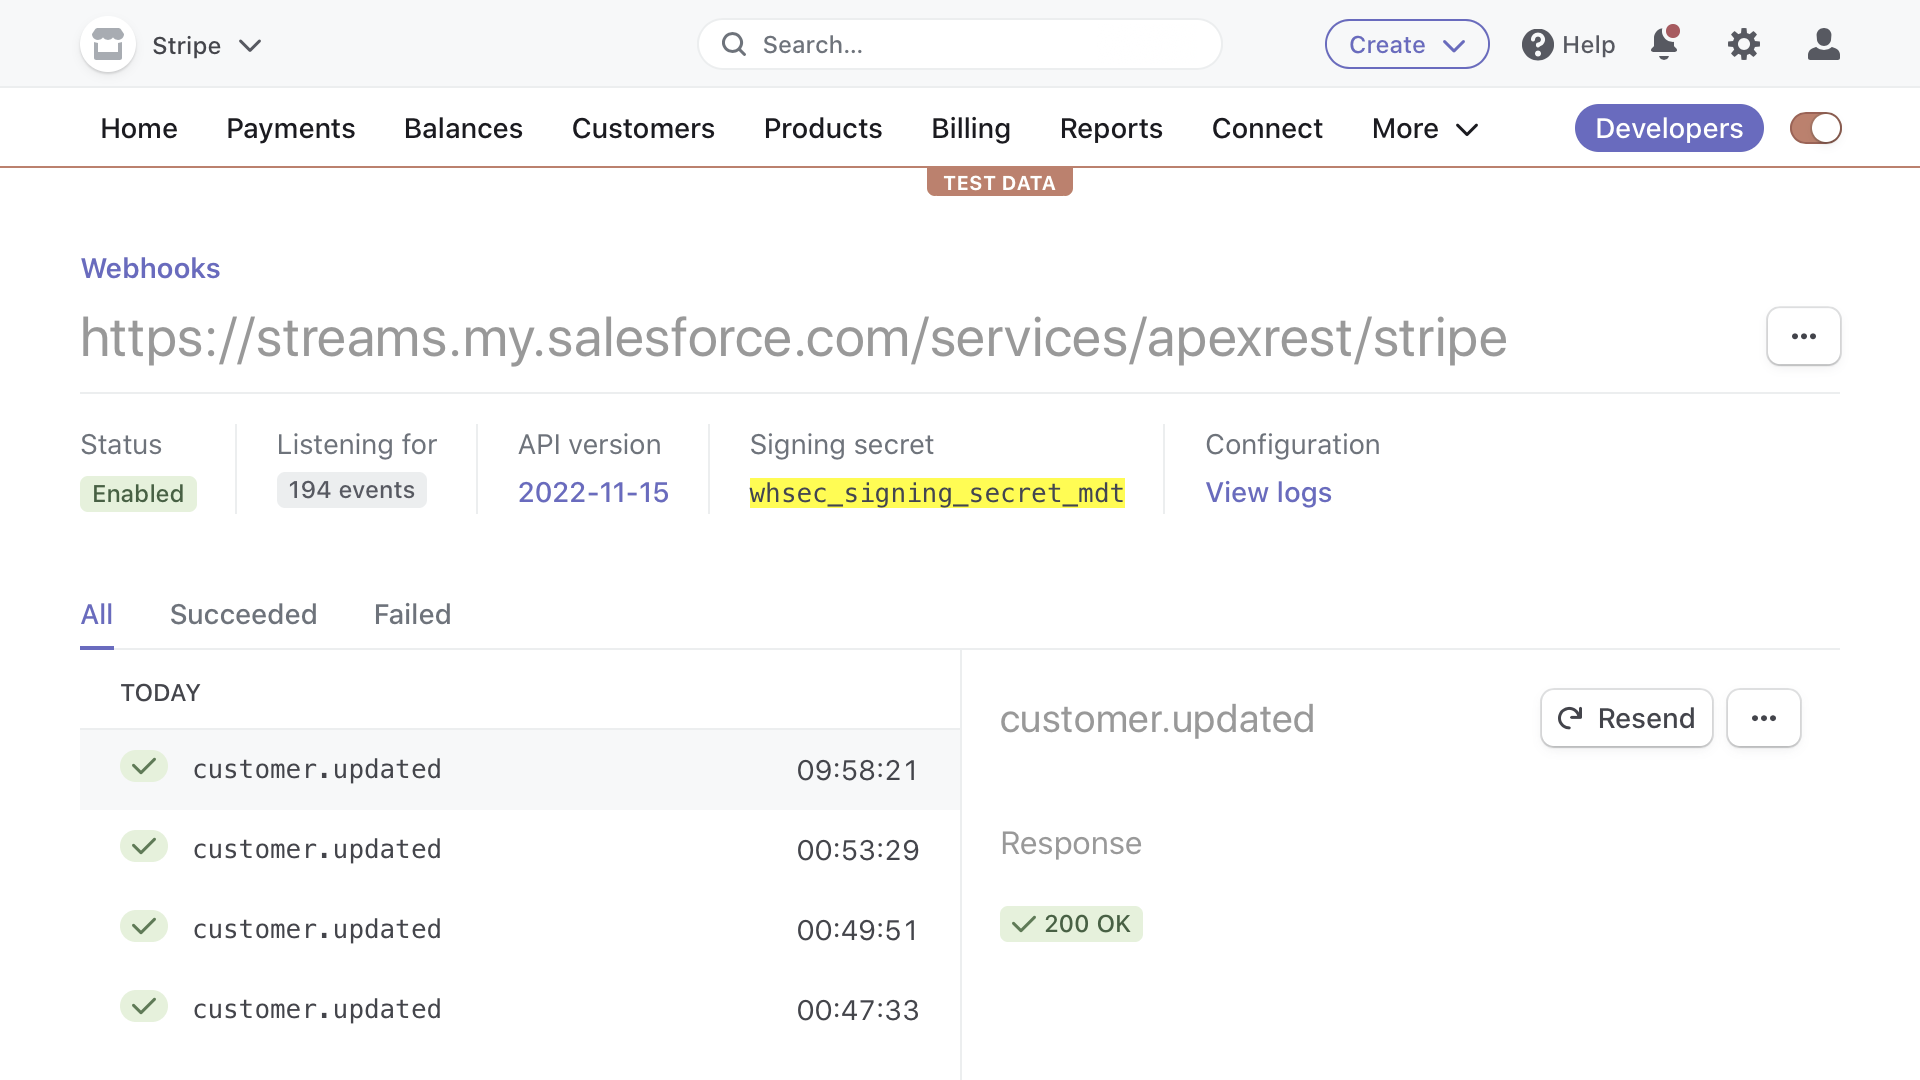
- Go to Stripe: Developers > Webhooks > Add Endpoint
- Paste the Endpoint URL from your clipboard
- Select events to publish, eg
customer.createdandcustomer.updated
Step 3 - In Salesforce, verify the webhook requests and store them
- First, paste your signing secret into a protected field of a Custom Metadata Type
- Open the webhook flow in flow builder: Webhook_Demo_Stripe
- Add a Get Records step named Stripe_mdt to read the secret
- Add a Streamscript step as the first element
- Copy and paste the script below
- Click Done
# Streamscript to verify the signature
$key = Base64-Encode {!Stripe_mdt}.Secret__c
$timestamp = $Webhook.requestHeaders.Stripe-Signature.substr(2, 12)
$hmac = Hex-Decode $Webhook.requestHeaders.Stripe-Signature.substr(16, 80)
$input = Base64-Encode `$timestamp.$Webhook.request`
if (!Crypto-Verify-Hmac 'hmacSHA256' $input $key $hmac) {throw $hmac}

# Streamscript to parse the incoming payload
$event = Json-Decode $Webhook.request

# Prepare a task
$Task = New-Task
$Task.Subject = $event.type
$Task.Description = Json-Encode $event.data.object
return $Task
Comments: first the script verifies the signature using protected fields of a Custom Metadata Type as a best practice. Then it converts the payload into a Task record. Using the fields of a record allows us to return several values at once from the script. We set the task's subject to the event type, so that a decision can be made in the next flow step.
Step 4 - Decide how to handle each event type
- Click Add element > Logic > Decision
- Create an outcome
{!Webhook.record.Subject}equalscustomer.created - Create another outcome
{!Webhook.record.Subject}equalscustomer.updated - Click Done
Insert a task record for each webhook request:
- Click Add element > Data > Create Records
- Set Create a Record from These Values to
{!Webhook.record} - Click Done
Finally click the gearwheel to enable the Site Guest User to insert records safely. In Flow Properties > Advanced > How to Run the Flow: System Context With Sharing.
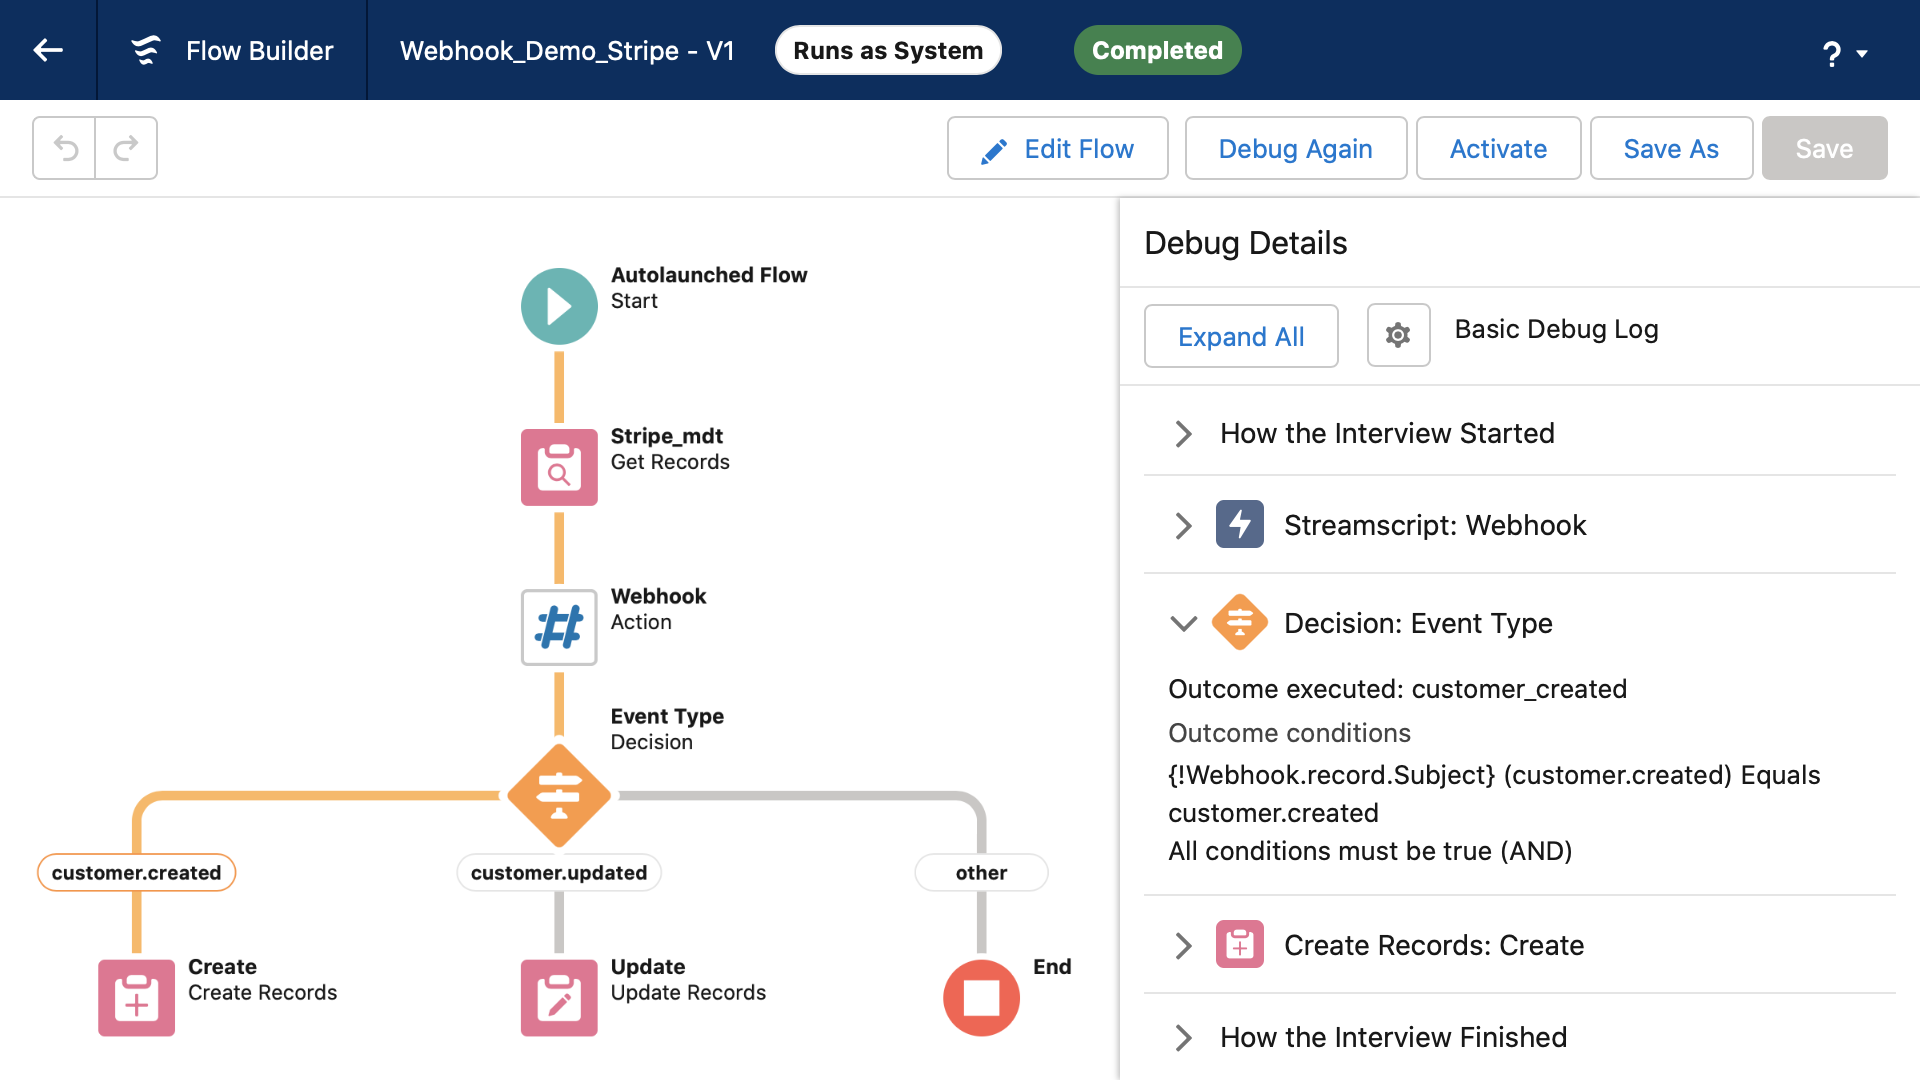
The saved record provides an audit trail. Use a scheduled flow to process the task records in the context of an integration user. The original webhook payload is stored in the Description field.
- Click Save
- Click Activate
The webhook is ready! Use the Resend button in Stripe to iterate and test.